Joomla User Manual
Article: Edit - Content
Introduction
Adding an Article was covered in a Getting Started article. This is the first of a series of articles providing more details of the Article: Edit form. It covers the Content tab and some aspects of the TinyMCE editor, the default editor provided with Joomla.
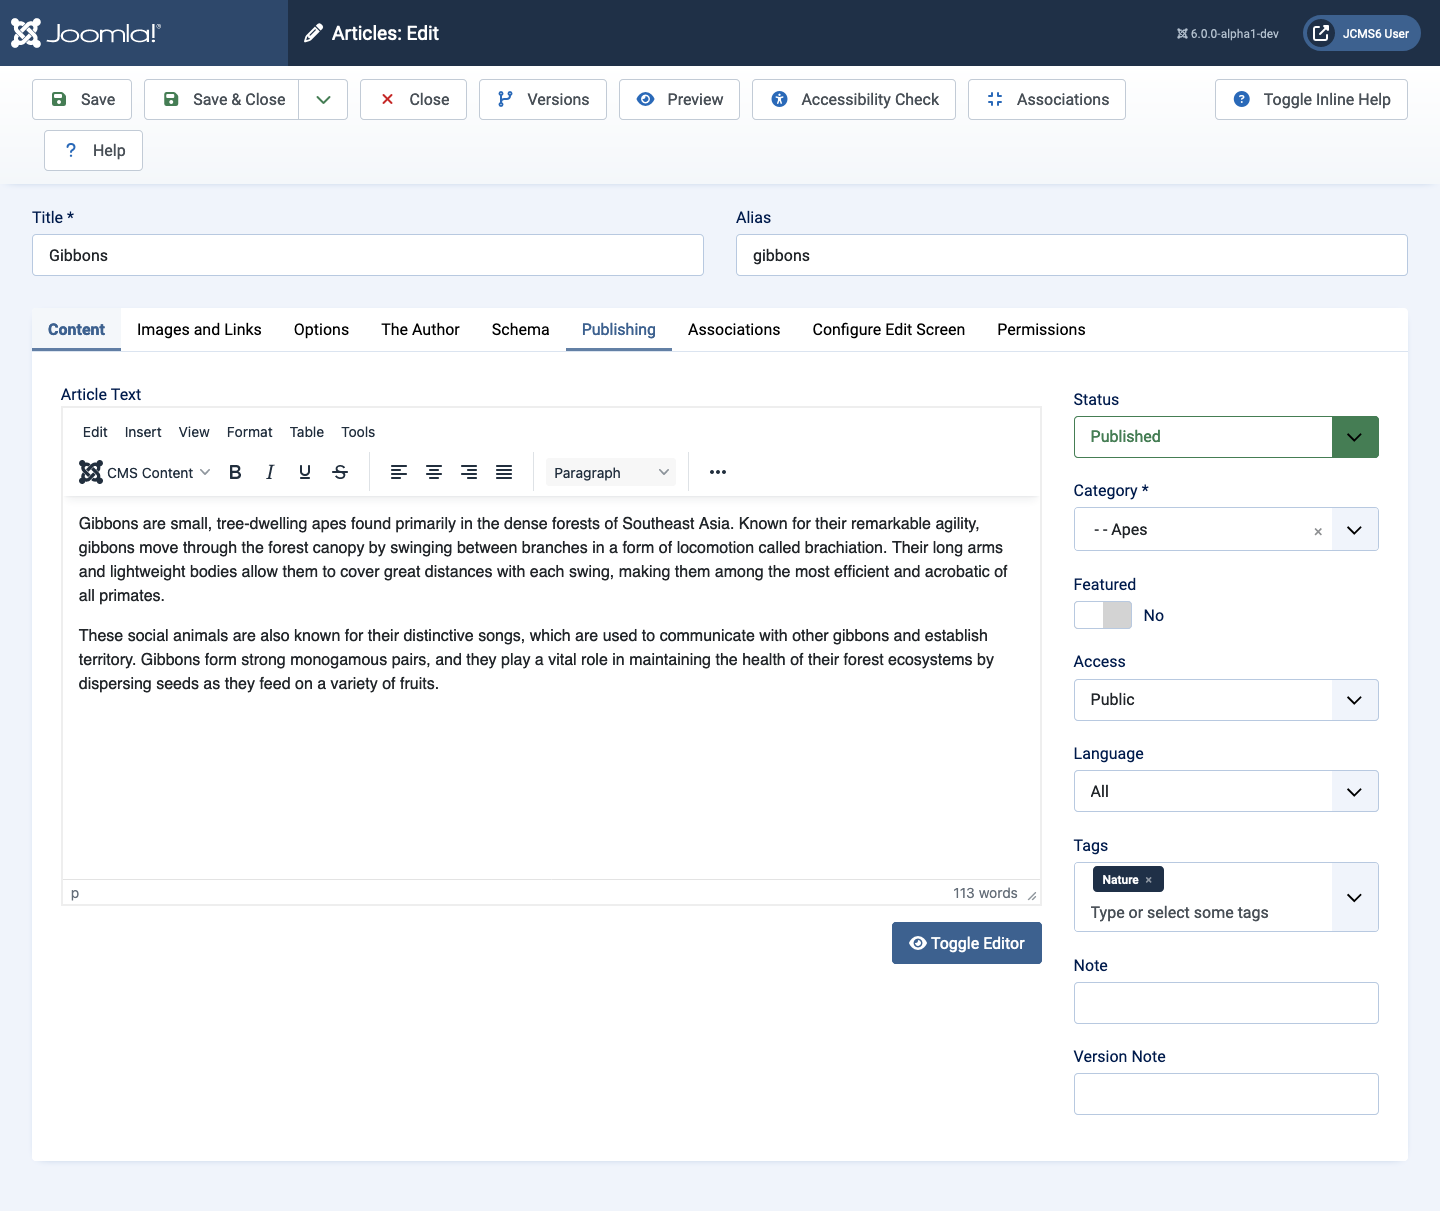
The following screenshot shows the edit form with an article that has already been saved.
Data Entry
The article edit form has tabbed panels. A new article has the Content tab selected by default. Otherwise, the last opened tab is selected.
The Title field
The Title field is Required and is used wherever the article title is displayed. This is the only field that must contain some text in order to save an edit form.
Titles should be short but descriptive of the article content as they appear in lists and menu items where space is limited.
Titles do not have to be unique, although it is best if they are. For example, if you select Save as Copy from the Save & Close drop-down list, the save process will save the current article and generate a new one with a number appended to the Title and Alias. You can remove the number from the Title but not the Alias and Save the copy. That gives two articles with the same display title.
The Alias field
The Alias field is usually left blank. When the article is saved the Alias is generated from the title by making it all lower case and replacing non alpha-numeric characters with dashes.
If you change the article title you can delete the Alias and a new one will be generated. If the Alias has been used to refer to the article in internal and external links this will break the links. So it is best not to change the Alias of an old article.
The Content Tab - Article Text
The screenshot above shows the article text in a WYSIWYG editor that looks rather like a word processor. However, you should be aware that the article text is stored as HTML and the data entry field is really a text area field containing that HTML. You can see it for yourself by selecting the Toggle Editor button beneath the edit area. The Editor is in fact a JavaScript application that redisplays the HTML to make it easy to read and manipulate.
Disallowed HTML Tags and Attributes
Both Joomla and the TinyMCE editor have settings that disallow certain HTML tags and attributes. For example, the Joomla default forbidden list includes iframe so if you try to include that tag in an article it will be silently removed on saving. Text filters are set in Global Configuration. The TinyMCE plugin has an option to Use Joomla Text Filter. If set to Off it lists script,applet,iframe as Prohibited Elements.
Editor Toolbars
Above the text area are rows of Toolbars. Two are displayed by default. The others can be toggled by selecting the ellipsis symbol (...) at the end of the second Toolbar. The Toolbars can be configured to show different bars and bar contents to different user groups.
There are too many tools to describe each one here. That would create a haystack for you to search for a needle. Just explore!
However, there are some features that warrant extra explanation.
CMS Content
This button reveals a drop-down list that allows inclusion of items in an article obtained from elsewhere in the CMS.
- Article This link reveals a popup list of articles. Select an article to include a link to that article in the current article.
- Contact Include a link to a Contact in the current article.
- Field Include a field in the article. It is displayed as
{field 1}. - Media Include an image or file from a Media component popup.
- Menu Include a link to a Menu item from a Menu list popup.
- Page Break There is a prompt for a Page Title and Table of Contents Alias. This feature is used to break long documents into several pages.
- Read More A Read More... separator is inserted at the position of the cursor. Choose a break between paragraphs before selection.
External links
The Insert item in the first Toolbar has options to insert a Link..., Image... or Media.... These are for external items so be ready with the URL of the item to be used.
The Content Tab - Settings
The Content tab is mostly occupied by the TinyMCE editor.
Alongside the content, there are fields to manage publishing, how and where the article will be displayed and who can see it when published. In most cases these settings may be left at their default values.
- Status Published, Unpublished, Archived or Trashed - the default is Published.
- Category This is a Required field but will default to Uncategorised. You can select a category from the list or type some characters from a category name to shorten the list of categories to choose from.
- Featured Toggle between No and Yes to display the article on the home page if that uses a Featured Articles layout.
- Access The access level can be changed to restrict the article to User Groups assigned to specific Access Levels: Public, Guest, Registered, Special or Super Users.
- Tags Start typing to find and select pre-defined tags or you can add a new one by typing it in and pressing enter.
- Note Any comment on this article which will be visible under the Title in the Articles list page.
- Version Note Add comments to indicate what changed in this version. This is displayed in the Versions modal dialog and the field reverts to empty after saving.
Other Tabs
You may not see all of the following tabs as a Site Administrator may hide some to help maintain the consistency of article layout across the website. You may also see additional tabs for Custom Fields if they have been set up.
- Images and Links allows you to set an intro and featured image and/or links to appear in predefined positions. This may be used if your article will be displayed within a category blog.
- Options allows you to specify the layout of the article and associated information such as title, category, tags, publishing details etc. This is normally set globally but can be article specific through these options.
- Schema is a method to add metadata to an article. It is used by robots but not seen by humans.
- Publishing allows you to set publishing dates and times to schedule publishing of an article. By default, when an article is saved it will be published straight away. You can also set the Metadata for the article.
- Configure Edit Screen allows you to show or hide parameters for the article.
- Permissions shows the permissions for each user group that control what can or cannot be done.
There are separate articles on each of these tabs.
Saving the Article
Once you have added the required information and content you can save the article. There are a number of ways to do this depending on what you wish to do next in Joomla.
To save the article you can choose to Save or Save & Close. The latter has dropdown options to Save & New, Save to Menu and Save as Copy.
- Save Save the article and keep it open for further editing. It is good practice to regularly save your work on longer articles.
- Save & Close Save the article and go to the Articles list. The Save & Close button has further
drop-down options:
- Save & New Save the article and then open an Articles: New page. This option saves time when adding multiple articles.
- Save to Menu Save the article and open a Menus: New Item page.
- Save as Copy Save the article then open an Articles: Edit page with a number in brackets appended to the title and the same number following a dash, -2 for example, in the alias field. You can change the title and change or delete the alias of the new article which has already been created.
A system message will indicate that the article has been successfully saved.
Errors on attempting to save:
- If you have not completed the required fields, a red error message will appear indicating the missing information you must add.
- You will see an error message if the article has an alias that already exists. You can overcome this by amending the alias field.
Tips
- If you are not the Super User or Administrator, take time to understand how the website is set up. Just because you have saved an article doesn't mean it is visible on the website. If Category Blog pages are being used, assigning the correct category will display the article. Otherwise an article needs to be assigned to a menu item. You can do this in the article or via the Administrator Menus menu.
- Try to keep article titles short and specific.
- Whilst it can be done, if there are several users adding articles to the website, avoid creating new categories and tags in articles. Spelling errors and differences can easily prevent articles from displaying where they were intended. Creating categories and tags in their respective list page ensures consistency across the website.
- If there is a need, make use of article notes. They can be very helpful, especially where several people add articles.
- Wherever you are in Joomla you can add an article without going to the Home Dashboard - use the Joomla Administrator Menu.