Joomla User Manual
Laragon for Windows
Setting Up a Local Joomla Environment using Laragon
Laragon is a lightweight Windows tool that handles Apache, MySQL, and PHP in one simple install. No config files, no manual setup - just download, run, and start building/testing Joomla. See this article in the Joomla Community Magazine: Laragon: The Effortless, High-Performance AMP Server for Windows.
This guide gets you from scratch to a working local Joomla site, and also covers a small UI quirk in the latest version that is easy to fix once you know what is happening.
Downloading and Installing Laragon
To get started, head over to the official Laragon download page. Download the Laragon Full version (currently v8.6.1), as it includes everything you need (like Apache, MySQL, and the latest PHP versions) right out of the box. Alternatively, you can download the installer directly.
Once the .exe file is downloaded, double-click it to begin the
installation.
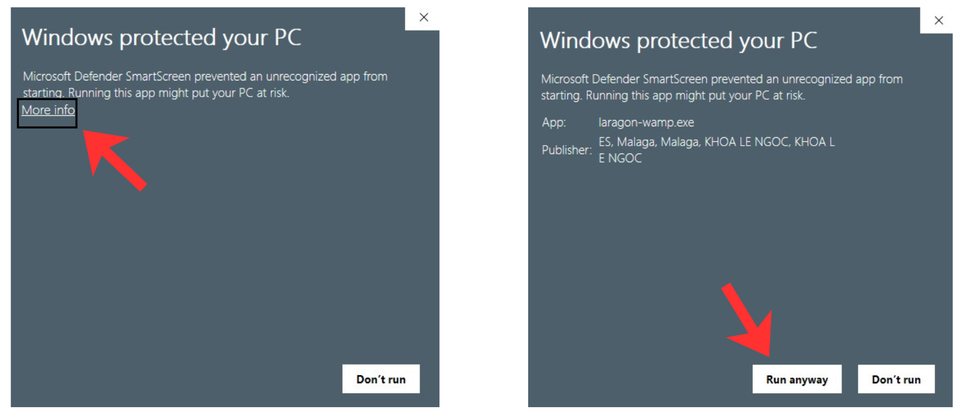
Note on Windows Defender: Because Laragon is a powerful developer tool, Windows Defender SmartScreen might block it from starting and show a blue warning screen. This is normal - Simply click More info, and then click the Run anyway button that appears at the bottom.
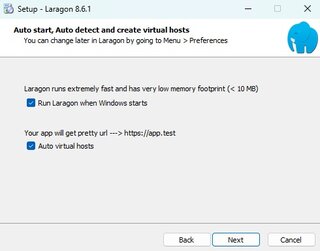
Click through the setup wizard. The default settings are perfectly fine, but keep an eye out for these two important details:
- Destination Location: Leave the installation folder as
C:\laragon. Installing it deep inside yourProgram FilesorDocumentscan sometimes cause permission issues later. - Setup Options: Make sure the Auto virtual hosts checkbox is
ticked. This is the feature that gives your local Joomla site a
clean address (like
http://myjoomla.test) instead of a raw IP address.
Once the installation finishes, restart your computer. (the installer wizard will prompt you to do the same)
Starting Your Server and Firewall Permissions
Open Laragon from your Start menu and click the Start All button.
Because this is your first time running a local server, Windows needs to verify that it is safe. You will see Windows Defender Firewall prompts pop up asking for network access for services like Apache HTTP Server, MySQL, and Mailpit.
- Simply click Allow access on each of these prompts.
Once allowed, Laragon will start your local environment. You will know it is working when you see the Apache and MySQL port numbers appear in the Laragon window.
The "Already Running" Quirk (and How to Fix It)
When you are done working, you might click "Stop All" to turn off Apache and MySQL, and then click the "X" in the top right corner to close the Laragon window.
Here is the quirk: clicking the "X" does not completely shut down Laragon. It keeps running silently in the background. If you try to open the Laragon app again from your Start menu or desktop, you will see a yellow warning in the bottom right corner of your screen that says: "Laragon is already running!"
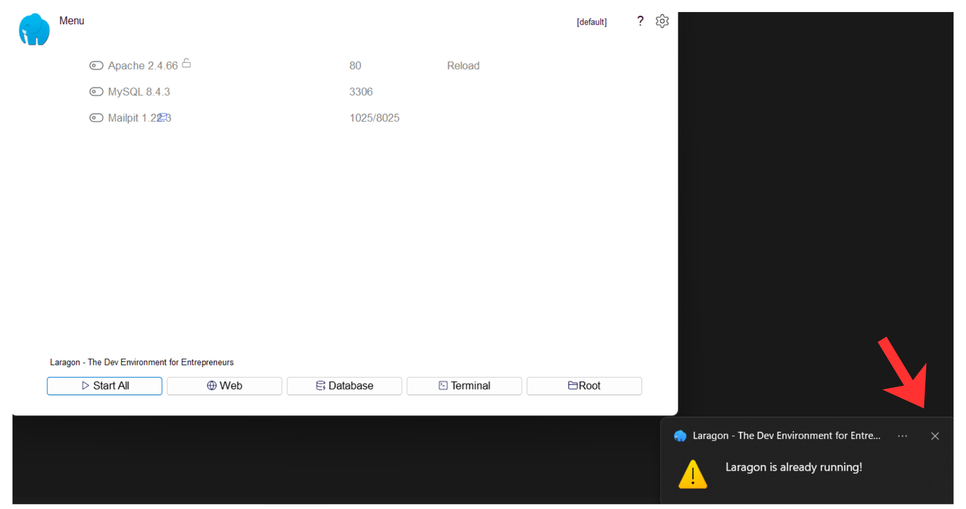
The Trap: If you click the "X" on that tiny yellow warning to close it, the main Laragon window will also disappear, leaving you completely unable to access the control panel. (Note: You might also occasionally see a license pop-up appear that causes the interface to freeze in a similar way).
The Fix: If your interface disappears or freezes, you just need to force-close the background process and start fresh. It is very simple:
- Press
Ctrl + Shift + Escon your keyboard to open the Windows Task Manager. - Look(Search) for Laragon in the list of running processes.
- Right-click on it and select End task.
That's it! You have safely killed the stuck background process. You can now open Laragon from your Start menu, and it will load up perfectly, allowing you to click "Start All" without any errors.
Handling the License Pop-Ups (The "Nag" Screens)
Laragon is free to use for non-commercial development and testing without purchasing a license. However, after using the app for a little while, you will likely encounter a "License Key" prompt encouraging you to support the project.
Because you are using the free version, you can simply dismiss these screens, but there is a specific sequence to expect:
- The main License Key window will appear over your Laragon
interface. Click the Close text or the 'X'.

- Immediately after closing it, a second Warning pop-up will
appear, reminding you that Laragon is running without a license.
Click OK or the 'X'.
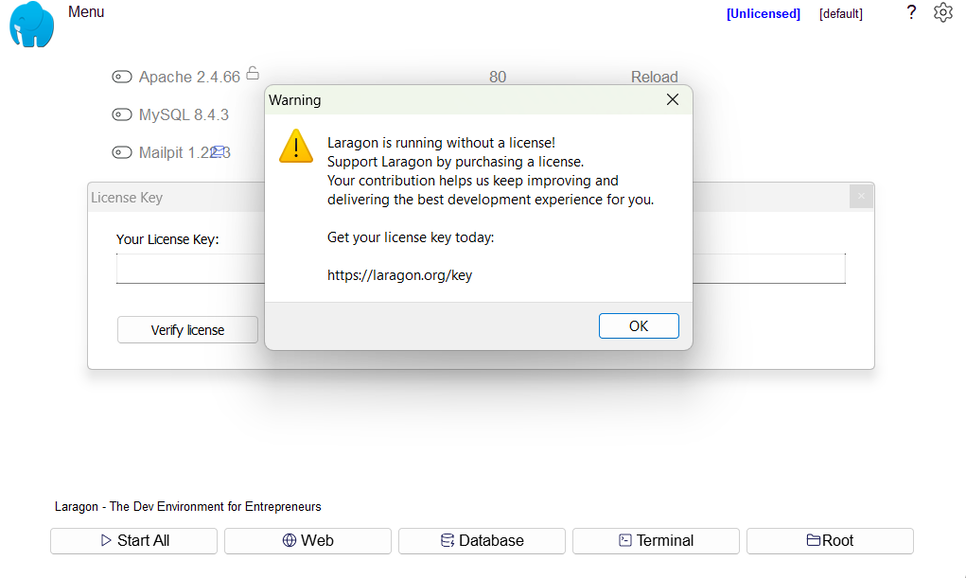
- Once you close that second warning, Laragon might automatically open
your web browser and redirect you to
https://laragon.org/key. You can simply close that browser tab. - When you go back to the Laragon interface and click Start All to turn your server back up, you might have to click through those exact same two pop-ups one more time.
After dismissing them this second time, the pop-ups will disappear, and you are completely free to use Laragon!
(Note: If at any point during these pop-ups your Laragon interface
freezes and becomes unclickable, just remember the Ctrl + Shift + Esc
Task Manager trick from the previous step to end the background process
and start fresh)
Creating a Database for Joomla
Before installing Joomla, you need a blank database to store its data. Laragon includes a built-in database manager called HeidiSQL, so everything you need is already there.
- Make sure your Laragon services are running (click Start All).
- Click the Database button on the main Laragon interface.
- A Session Manager window will open. Laragon automatically fills in
the default local credentials for you (User:
root, Password: [leave blank]). - Click the Open button at the bottom.
**Troubleshooting: "Access denied for user 'root'@'localhost'" Error: ** If you click the Open button and immediately get a connection failed error, don't worry! This usually means you have another MySQL program (like XAMPP or MySQL Workbench) running in the background, which is blocking Laragon's access to the database port (Port 3306).
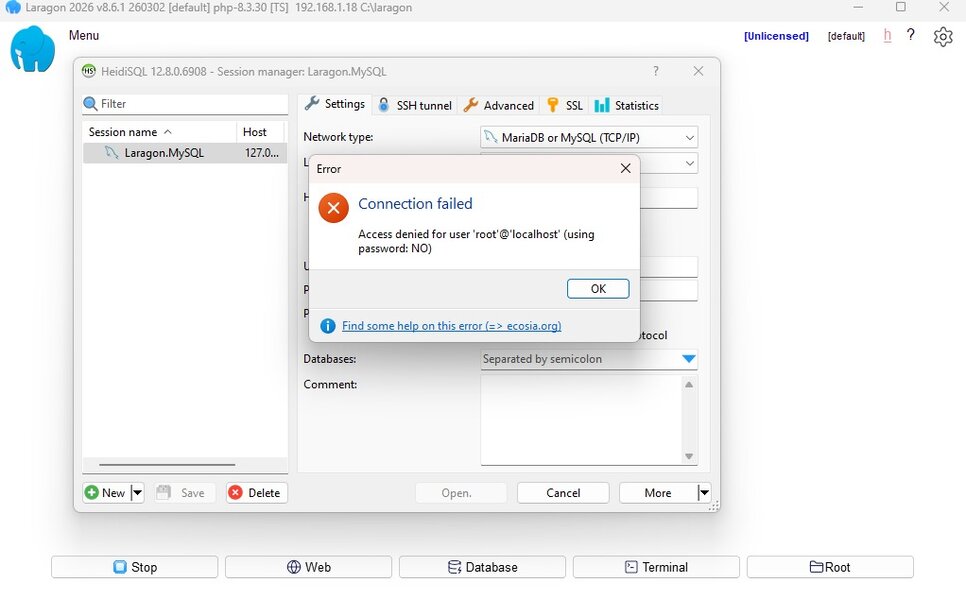
- Press the Windows key, type Services, and hit Enter.
- Scroll down the list to find MySQL, MySQL80, or MariaDB.
- Right-click the running service and select Stop.
- Go back to Laragon, click Stop All, then Start All, and try clicking Open in the Session Manager again. It should connect without any error.
- Once you are successfully connected and inside the HeidiSQL database
manager, look at the left-hand column. Right-click on the server
name (usually labeled
Laragon.MySQLor127.0.0.1). - Hover over Create new, and select Database.
- A small prompt will appear. Type a simple name for your database in
the "Name" field (for example:
joomla_dev). You can leave the "Collation" dropdown on its default setting. - Click OK.
You will see your new database appear in the list on the left. That's it! You can now close the database manager window completely.
Getting Your Joomla Files
Now that your server and database are ready, it’s time to get the Joomla files in place. How you do this depends entirely on what you want to achieve with this local setup:
Method 1: For Building a Standard Website If you just want to build a website or test out extensions, you need the standard stable release.
- Head over to the official Joomla download page
and download the latest Full Package
.zipfile.
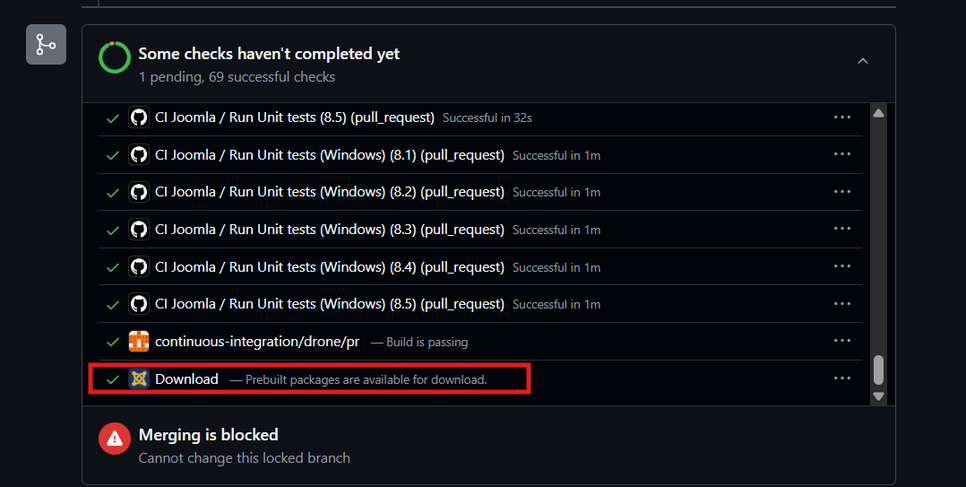
Method 2: For Testing Community PRs (Patch Testing) If your goal is to help the community by testing patches and Pull Requests, you need a pre-built package that contains the absolute latest code.
- The Nightly Build: Download the latest Nightly Build
.zipfrom Nightly Builds. These are generated every night and are perfect for use with the Joomla Patch Tester component. - The PR Prebuilt Package: Alternatively, if you are testing a
specific PR on GitHub, scroll to the bottom of the PR page, click
Show all checks, and look for the Download Prebuilt packages
link.
Method 3: For Contributing Core Code If you plan to write code and submit your own Pull Requests, you need the raw, uncompiled source code.
- Clone the Joomla CMS GitHub repository directly into your Laragon environment using Git.
- Important: A raw GitHub clone will not run out of the box - You must
open Laragon's Terminal and run
composer installandnpm ciinside your folder to build the PHP dependencies and CSS/JS assets. (Because you installed the Full version of Laragon, Composer and NPM are already installed on your system).
Placing the Files in Laragon:
No matter which method you chose, getting the files running in Laragon is the exact same process:
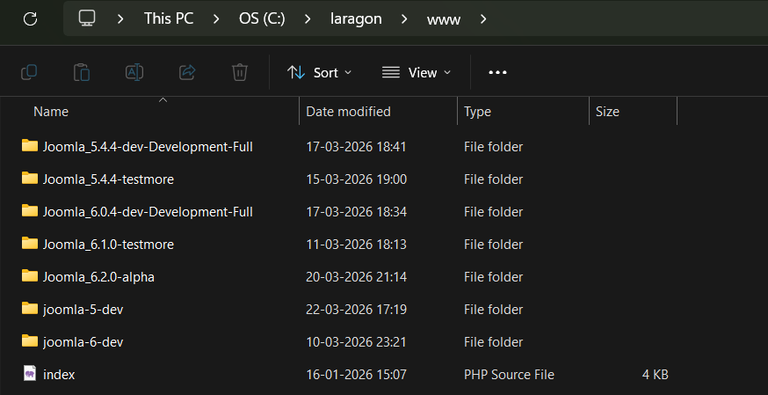
- Open your Laragon interface and click the Root button. This
automatically opens the
C:\laragon\wwwfolder on your computer. - Inside this
wwwfolder, create a new folder for your project. Keep the folder name simple, lowercase, and without spaces (for example:joomla_devorjoomla_pr_test). - Place your Joomla files inside this new folder. (If you downloaded a
.zipin Method 1 or 2, extract all the contents directly into this folder. If you are using Git in Method 3, clone the repo into this folder). - Because you enabled "Auto virtual hosts" during installation,
Laragon automatically uses your folder name to create your local web
address. So, a folder named
joomla_devbecomes accessible in your browser athttp://joomla_dev.test.
Tip: Keep Your Environments Clean: It is a good idea to create different folders for different Joomla versions or specific PR tests (e.g., one folder namedjoomla5_stableand another namedjoomla4_dev). Laragon will happily run them all side-by-side with their own clean.testURLs, preventing your code and databases from getting mixed up!
Running the Joomla Installer
You have your database, and your Joomla files are sitting in their new
folder (for example, C:\laragon\www\joomla_dev). Now it’s time to
actually install Joomla!
Crucial Step: Reload Apache! If Laragon was already running while you created your new project folder, Laragon doesn't know the folder exists yet.
-
Open your Laragon interface.
-
Click the "Reload" on top-right. (This forces Laragon to scan the
wwwfolder and generate the newhttp://joomla_dev.testaddress).
Completing the Setup:
- Open your web browser and type in your project's auto-generated URL
(e.g.,
http://joomla_dev.test). - You should immediately see the Joomla Web Installer page.
- Choose your language and enter a name for your Joomla site.
- Set up your Super User account (remember these login details, you will need them to access the Joomla administrator dashboard!).
- On the Database Configuration screen, enter the credentials for
the Laragon database you created earlier:
- Database Type:
MySQLi(Default) - Host Name:
localhost - Username:
root - Password: [Leave this completely blank]
- Database Name: The exact name you typed into HeidiSQL earlier
(e.g.,
joomla_dev).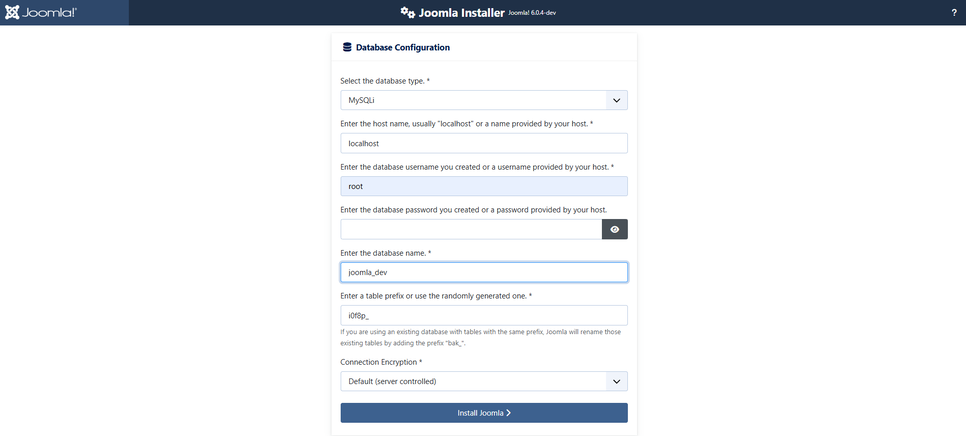
- Database Type:
- Click Install Joomla.
Once the progress bar finishes, you will see a success message - You can now click Open Site to view your live local website, or Open Administrator to log into the Joomla backend.
That's it - your local Joomla site is live and ready to use.