Joomla Help Screens
Manual Index
Site Modules: Articles - Category
Description
The Articles - Category module type displays a list of published articles from one or more categories.
How to Access
- Select System → Manage Panel → Site Modules from the
Administrator menu. Then...
- To create a new module: select the New button from the Toolbar.
Then...
- Select the required module type.
- To edit an existing module:
- Find the module in the list of installed modules and select the title link in the Title column.
- To create a new module: select the New button from the Toolbar.
Then...
Screenshot
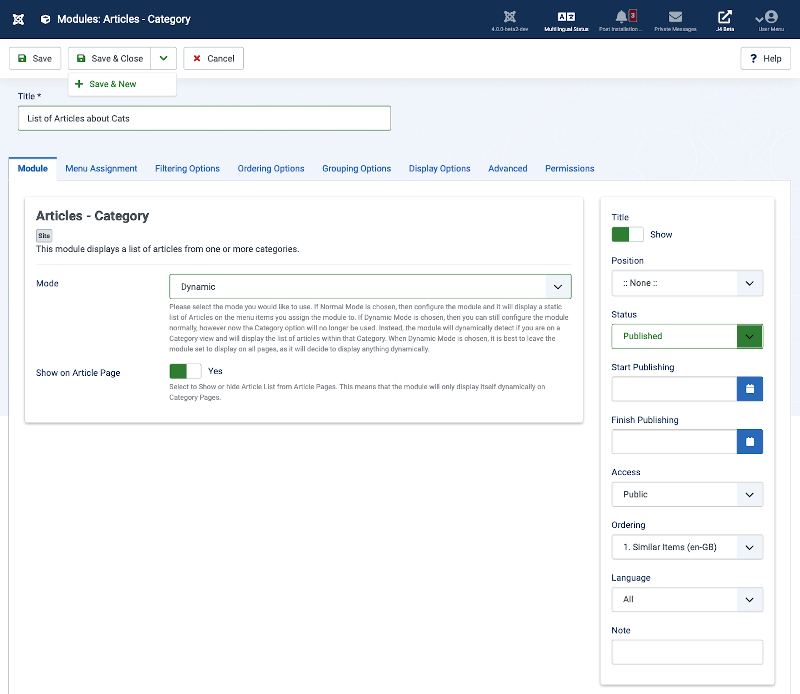
Form Fields
- Title. The title of the module. This is also the title displayed for the module depending on the Show Title Form Field
Module Tab
Left Panel
- Mode: (Normal/Dynamic). Please select the mode you would like to use. If Normal Mode is chosen, then simply configure the module and it will display a static list of Articles on the menu items you assign the module to. If Dynamic Mode is chosen, then you can still configure the module normally, however now the Category option will no longer be used. Instead, the module will dynamically detect whether or not you are on a Category view and will display the list of articles within that Category accordingly. When Dynamic Mode is chosen, it is best to leave the module set to display on all pages, as it will decide whether or not to display anything dynamically.
- Show on Article Page: (Show/Hide). Select to Show or Hide Article List from Article Pages. This means that the module will only display itself dynamically on Category Pages.
Right Panel
- Show Title. (Show/Hide) Choose whether to show or hide the modules title in the front end. The title will be the one in the Form Field above.
- Position. Choose the module position you wish this module to be displayed in. A custom module position can be entered for use with the load position plugin or the position button can be pressed to select a module position from the template.
- Status. The published status of the item.
- Access. The viewing Access Level for this item.
- Module Ordering. This shows a drop down of every module in the position that the current module is in. This is the order that the modules will display in when displayed on in the front end as well as in the Modules page.
- Start Publishing. Date and time to start publishing. Use this field if you want to enter content ahead of time and then have it published automatically at a future time.
- Finish Publishing. Date and time to finish publishing. Use this field if you want to have content automatically changed to Unpublished state at a future time (for example, when it is no longer applicable).
- Language. Item language.
- Note. This is normally for the site administrator's use (for example, to document information about this item) and does not show in the Frontend of the site.
Menu Assignment Tab

- Module Assignment. Select On All Pages, No Pages, Only on the pages selected or On all pages except those selected from the List.
- Menu Selection. If the latter two options are selected a list will show all of the menu items. This allows you to assign modules to some but not all pages, and by selecting the menu links that you want the module associated with you can customize on what pages modules appear/don't appear. See How do you assign a module to specific pages? for more information.
Filtering Options Tab

- Featured Articles: (Show/Hide/Only). Select to Show, Hide, or Only display Featured Articles.
- Count: The number of items to display. The default value of 0 will display all articles.
- Category Filtering Type: (Inclusive/Exclusive). Select Inclusive to Include the Selected Categories, Exclusive to Exclude the Selected Categories.
- Category: Please select one or more categories.
- Child Category Articles: (Include/Exclude). Include or Exclude Articles from Child Categories.
- Category Depth: The number of child category levels to return.
- Author Filtering Type: (Inclusive/Exclusive). Select Inclusive to Include the Selected Authors, Exclusive to Exclude the Selected Authors.
- Authors: Select one or more authors from the list below.
- Author Alias Filtering Type: (Inclusive/Exclusive). Select Inclusive to Include the Selected Author Aliases, Exclusive to Exclude the Selected Author Aliases.
- Author Aliases: Select one or more author aliases from the list below.
- Article IDs to Exclude: Please enter each Article ID on a new line.
- Date Filtering: (Off/Date Range/Relative Date). Select Date Filtering Type.
- Date Range Field: (Created Date/Modified Date/Start Publishing Date). Select which date field you want the date range to be applied to.
- Start Date Range: If Date Range is selected above, please enter a Starting Date.
- To Date: If Date Range is selected above, please enter an End Date.
- Relative Date: If Relative Date is selected above, please enter in a numeric day value. Results will be retrieved relative to the current date and the value you enter.
Ordering Options Tab
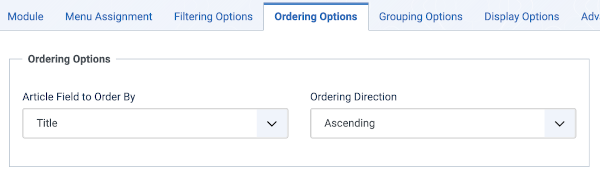
- Article Field to Order By: (Article Manager Order/Featured Articles Order/Hits/Title/ID/Alias/Created Date/...). Select which field you would like Articles to be ordered by. Featured Ordering should only be used when Filtering Option for Featured Articles is set to 'Only'.
- Ordering Direction: (Descending/Ascending). Select the direction you would like Articles to be ordered by.
Grouping Options Tab

- Article Grouping: (None/Year/Month and Year/Author/Category). Select how you would like the articles to be grouped.
- Grouping Direction: (Descending/Ascending). Select the direction you would like the Article Groupings to be ordered by.
- Month and Year Display Format: Please enter in a valid date format. See: http://php.net/date for formatting information.
Display Options Tab

- Linked Titles: (Yes/No).
- Date: (Show/Hide). Select Show if you would like the date displayed.
- Date Field: (Created Date/Modified Date/Start Publishing Date). Select which date field you want to display.
- Date Format: Please enter in a valid date format. See: http://php.net/date for formatting information.
- Category: (Show/Hide). Select Show if you would like the category name displayed.
- Hits: (Show/Hide). Select Show if you would like the hits for each article to be displayed.
- Author: (Show/Hide). Select Show if you would like the author (or author alias instead, if available) to be displayed.
- Introtext: (Show/Hide). Select Show if you would like the introtext to be displayed.
- Introtext Limit: Please enter in a numeric character limit value. The introtext will be trimmed to the number of characters you enter.
- Show "Read More": (Show/Hide). If set to Show, the Read more... Link will show if Main text has been provided for the Article.
- Show Title with Read More: (Show/Hide). If set to show the Title of the Article will be shown on the Read More button.
- Read More Limit: Set a limit of number of characters in Article Title to show in Read More button.
Advanced Tab
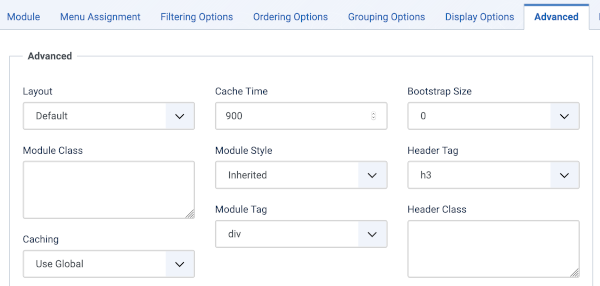
- Layout. If you have defined one or more alternative layouts for a module either in the template or Joomla! Core, you can select the layout to use for this module.
- Module Class. A suffix applied to the CSS class of the Module. This allows you to create customized CSS styles that will apply just to this module. You would then modify the "user.css" file of your template to apply styling to this new class. Enter this parameter with a leading space to create a new CSS class for this module. Enter the parameter without a leading space to change the CSS class name for this module.
- Caching. Use Global/No Caching. Whether or not to cache the content of this Module. A setting of "Use Global" will use the Cache Settings from the Global Configuration screen.
- Cache Time. The number of seconds for which to cache the item locally. It can safely be left at the default.
- Module Style. You can use this option to override the templates style for its position.
- Module Tag. The HTML tag for the module to be placed in. By default this is a div tag but other HTML5 elements can also be used.
- Bootstrap Size. (Values 0 to 12) This allows you to choose the width of the module via the span element built into bootstrap.
- Header Tag. The HTML tag to use for the modules header or title. This can be an h1, h2, h3, h4, h5, h6 or a p tag. Note that you must use a module style (chrome) of html5 or add your custom module styles in <mytemplate>/html/modules.php.
- Header Class. Here you can add optional CSS classes to add to the modules header or title element.
Module Permissions Tab
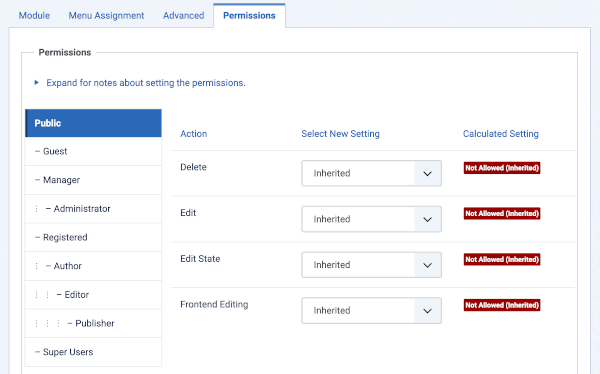
To change the permissions, do the following.
- Select the Group by clicking its title located on right.
- Find the desired Action. Possible Actions are:
- Delete. Users can delete the module.
- Edit. Users can edit the module.
- Edit State. User can change the published state and related information for the module.
- Select the desired permission for the action you wish to change.
Possible settings are:
- Inherited. Inherited for users in this Group from the Global Configuration, Article Manager Options, or Category permissions.
- Allowed. Allowed for users in this Group. Note that, if this action is Denied at one of the higher levels, the Allowed permission here will not take effect. A Denied setting cannot be overridden.
- Denied. Denied for users in this Group.
- Select Save in the Toolbar. When the screen refreshes, the Calculated Setting column will show the effective permission for this Group and Action.
Toolbar
At the top of the page you will see the toolbar shown in the Screenshot above. The functions are:
- Save. Saves the item and stays in the current screen.
- Save & Close. Saves the item and closes the current screen.
- Save & New. Saves the item and keeps the editing screen open and ready to create another item.
- Save as Copy. Saves your changes to a copy of the current item. Does not affect the current item. This toolbar icon is not shown if you are creating a new item.
- Close. Closes the current screen and returns to the previous screen without saving any modifications you may have made.
- Help. Opens this help screen.
Front End Screenshot
Example Front End Site images are generic images using Joomla! core installation supplied free Front End Templates. The actual view can depend on the installed custom template used and the template's style for those views on a Joomla! website. Articles Category module shown:

The Module Type name for this Module is "mod_articles_category". It is related to the content component.