Joomla Help Screens
Manual Index
News Feeds
Description
The News Feed Manager screen allows you to add News Feeds from other sites to your Joomla! site. You can add links to these feeds for users by creating News Feed layouts in Menu Item Manager - New/Edit.
How to Access
- Select Components → News Feeds → Feeds from the Administrator menu.
- Or select the Feeds link from the News Feeds Manager - Categories.
Screenshot
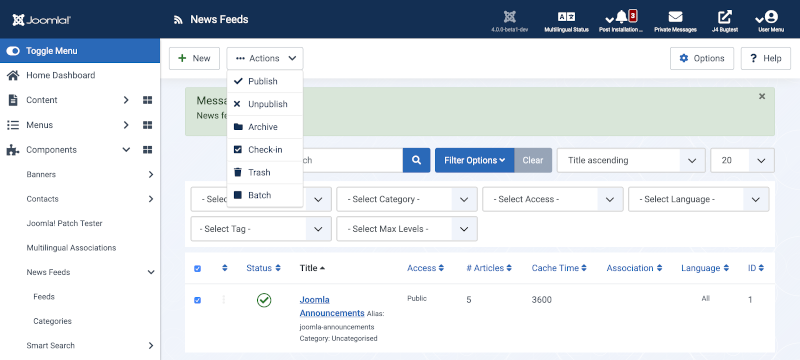
Column Headers
Click on the column heading to sort the list by that column's value.
- Checkbox. Check this box to select one or more items. To select all items, check the box in the column heading. After one or more boxes are checked, click a toolbar button to take an action on the selected item or items. Many toolbar actions, such as Publish and Unpublish, can work with multiple items. Others, such as Edit, only work on one item at a time. If multiple items are checked and you press Edit, the first item will be opened for editing.
-
Ordering. You can change the order of an item within a list as
follows:
- If the list Filter Options include a Position filter select the desired Position. This will limit the list to items that are assigned to that Position.
- Select the Ordering icon
 in the Table
heading to make it the active ordering item. The ordering icons in
each row will change from light grey to dark grey and the pointer
will change to a drag arrow on hover.
in the Table
heading to make it the active ordering item. The ordering icons in
each row will change from light grey to dark grey and the pointer
will change to a drag arrow on hover. - Select one of the Ordering icons
 and
drag it up or down to change the position of that row in the list.
The items will display in the new order within the Position.
and
drag it up or down to change the position of that row in the list.
The items will display in the new order within the Position.
- Status. The published status of the item.
- Title. The name or title of the feed. Make it as descriptive as possible.
- Access. The viewing Access Level for this item.
- # Articles The number of articles included in the feed.
- Cache Time. The number of seconds for which to cache the item locally. It can safely be left at the default.
- Association: Shows which menu item this item is associated.
- Language. Item language.
- ID. This is a unique identification number for this item assigned automatically by Joomla. It is used to identify the item internally, and you cannot change this number. When creating a new item, this field displays "0" until you save the new entry, at which point a new ID is assigned to it.
List Filters
Search bar. Near the top of the page you will see the search bar shown in the Screenshot above.
- Search by Text. Enter part of the search term and click the Search icon. Hover to see a Tooltip indicating which fields will be searched.To 'Search by ID' enter "id:x", where "x" is the ID number (for example, "id:19").
- Filter Options. Click to display the additional filters.
- Clear. Click to clear the Filter field and restore the list to its unfiltered state.
-
Ordering. Shows the current list ordering field. 2 ways to change
the order:
- Select from the dropdown list. Ordering may be in ascending or descending order.
- Click a column heading. The column heading toggles between ascending and descending order.
- Number to Display. Shows the number of items in a list. Select from the dropdown list to change the number displayed.The default for a site is '20' but this may be changed in the Global Configuration.
Filter Options
- Select Status. Use the drop-down list box to select the published state: Published, Unpublished, Trashed, or All. For Articles, you may also select Archived. Important: With the default setting of -Select Status-, the screen only shows Published and Unpublished items. If you have the filter set to -Select Status- and you change items to Trashed, the Trashed items will disappear from the screen. However, they have not been permanently deleted. To do that you need to:
- Change the filter to Trashed. The Delete icon will now show in the toolbar.
- Select the items you want to permanently delete.
- Click on the Delete icon.
You can see all items, regardless of their published state, by selecting All for this filter. You can also re-publish Trashed items by selecting them and clicking on the Publish icon in the toolbar.
- Select Category. Select from the list of available categories.
- Select Access. Select from the list of available viewing access levels.
- Select Language. Select from the list of available languages, if the site manages more than 1 language.
- Select Tag. Select from the list of available tags.
- Select Max Levels. Select from the list of available levels.
Toolbar
At the top of the page you will see the toolbar shown in the Screenshot above. The functions are:
- New. Opens the editing screen to create a new news feed.
- Actions: Reveals a list of actions for selected Items. Check one or more Item checkboxes to activate the list.
- Publish. Makes the selected news feeds available to visitors to your website.
- Unpublish. Makes the selected news feeds unavailable to visitors to your website.
- Archive. Changes the status of the selected news feeds to indicate that they are archived. Archived news feeds can be moved back to the published or unpublished state by selecting 'Archived' in the 'Select Status' filter and changing the status of the news feeds.
- Check-In. Checks-in the selected news feeds. Works with one or multiple news feeds selected.
- Trash. Changes the status of the selected news feeds to indicate that they are trashed.Trashed news feeds can still be recovered by selecting 'Trashed' in the 'Select Status' filter and changing the status of the articles to Published or Unpublished as preferred.To permanently delete trashed news feeds, select 'Trashed' in the 'Select Status' filter, select the news feeds to be permanently deleted, then click the 'Empty Trash' toolbar icon.
- Batch. Batch processes the selected news feeds. Works with one or multiple items selected.
- Options. Opens the Options window where settings such as default parameters can be edited.
- Help. Opens this help screen.
Quick Tips
- You need to add at least one Category for news feeds before you add the first feed. Categories are added by clicking on 'News Feeds', and then on 'Categories' in the 'Components' menu.
Related Information
- To set News Feed Options: News Feed Options
- To create or Edit News Feeds: News Feeds Manager - New/Edit
- To work with News Feed Categories: Category Manager (News Feeds)