Joomla Help Screens
Manual Index
Menu Item: Single Article
Description
The Single Article menu item type is used to show one article in the Frontend of the site.
How To Access
Select Menus → [name of the menu] from the Administrator menu.
To add a Menu Item:
- click the New toolbar button.
- click the Menu Item Type Select button.
- select the Articles item.
- select the Single Article item.
To edit a Menu Item:
- select a Title from the list
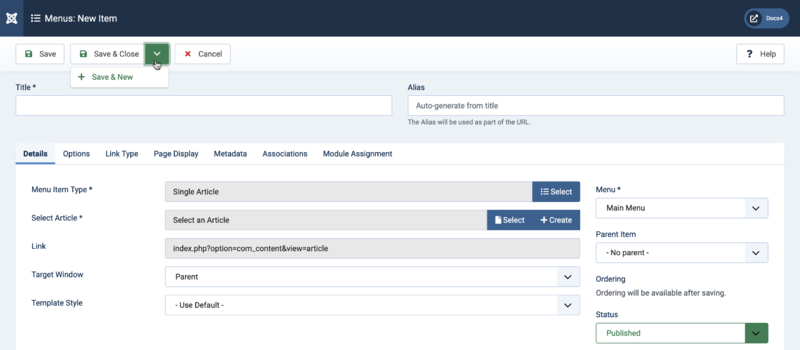
Screenshot
Form Fields
- Title. The title that will display for this menu item.
- Alias. The internal name of the menu item. Normally, you can leave this blank and Joomla will fill in a default value Title in lower case and with dashes instead of spaces.
Details
Left Panel
- Menu Item Type. The Menu Item Type selected when this menu item was created. This can be one of the core menu item types or a menu item type provided by an installed extension.
- Select Article. This field holds the article to be shown in the menu item. Press the Select/Change button to open the article selection window.This screen is similar to the Articles page. You can use the Filter fields to find the desired article and then click on the article's Title to select it. At that point, the modal window will close and the title will show in the Select Article field.
- Link. The system-generated link for this menu item. This field cannot be changed and is for information only.
- Target Window. Select from the dropdown list.
- Template Style. Select from the dropdown list.
Right Panel
- Menu. Shows which menu the link will appear in.
Options
The Options determine how the article will show on the Frontend Site layout.

Note: Options include "Use Global". If this is selected, the setting from the Articles: Options will be used.
- Title. Show the Article's Title.
- Linked Titles. Show the title as a link to the article.
-
Intro Text.
- Show: The Intro Text of the article will show when you drill down to the article.
- Hide: Only the part of the article after the Read More break will show.
-
Position of Article Info.
- Above: Puts the article information block above the text.
- Below: Puts the article information block below the text.
- Split: Splits the article information block into 2 separate blocks. One block is above and the other is below the text.
- Article Info Title. Displays 'Details' on top of the article information block.
- Category. Show the Article's Category Title.
- Link Category. Show the title as a link to that Category.Note: You can set this to be either a blog or list layout with the Choose a Layout option in the Category Tab.
- Parent Category. Show the Article's Parent Category Title.
- Link Parent Category. Show the title as a link to that Category.Note: You can set this to be either a blog or list layout with the Choose a Layout option in the Category Tab.
- Associations. Show the associated flags or Language Code. Multilingual only.
- Author. Show the author of the Article.
- Link to Author's Contact Page. Show it as a link to a Contact layout for that author.Note: The author must be set up as a Contact. Also, a link will not show if there is an Author Alias value for the article.
- Create Date. Show the Article's create date.
- Modify Date. Show the Article's modify date.
- Publish Date. Show the Article's start publishing date.
- Navigation. Show a navigation link 'Prev' or 'Next' when you drill down to the article.
- Hits. Show the number of times the article has been displayed by a user.
- Tags. Show the tags for each article.
-
Unauthorised Links.
- Yes: The Intro Text for restricted articles will show. Clicking on the Read more link will require users to log in to view the full article content.
- No: Articles that the user is not authorised to view (based on the viewing access level for the article) will not show.
-
Positioning of the Links.
- Above: Links are shown above the content.
- Below: Links are shown below the content.
Common Options
See Menus: New Item for help on fields common to all Menu Item types, including:
- Right Panel
- Link Type
- Page Display
- Metadata
- Associations
- Module Assignment
Toolbar
At the top of the page you will see the toolbar shown in the Screenshot above.
- Save. Saves the menu item and stays in the current screen.
-
Save & Close. Saves the menu item and closes the current screen.
- Save & New. Saves the menu item and keeps the editing screen open and ready to create another menu item.
- Cancel. Closes the current screen and returns to the previous screen without saving any modifications you may have made.
- Help. Opens this help screen.
Quick Tips
- If you have a Single Article Layout defined for an article, that layout will show any time a user drills down to that article. For example, if an article is shown on another menu item type (for example, in a Category Blog or List Layout or a Featured Articles Layout), the user will be taken to the Single Article Layout for that article (if defined).
- Archived articles are no longer published but are still stored on the site. Articles are Archived using the Articles screen. Note that Articles assigned to the 'Uncategorised' Section will not show on the Archived Article List layout.