Joomla Help Screens
Manual Index
Articles: Edit
Description
This page is used to add a new article or edit an existing article, usually using a Wysiwyg editor. The default editor is TinyMCE but if other editors are installed the default editor may be set to something else for the site as a whole or for individual users.
Common Elements
Some aspects of this page are covered in separate Help articles:
- Toolbars.
- The Schema Tab.
- The Publishing Tab.
- The Associations Tab.
- The Permissions Tab.
- The Version History Popup.
Or in User articles:
How to Access
- Select Content → Articles from the Administrator menu. Or...
- Select Articles from the Home Dashboard. Then...
- Select an existing article Title in the list to edit it. Or...
- Select the New button in the Toolbar to create a new article. You can also create a new article by selecting the + icon in the Menu or Home Dashboard.
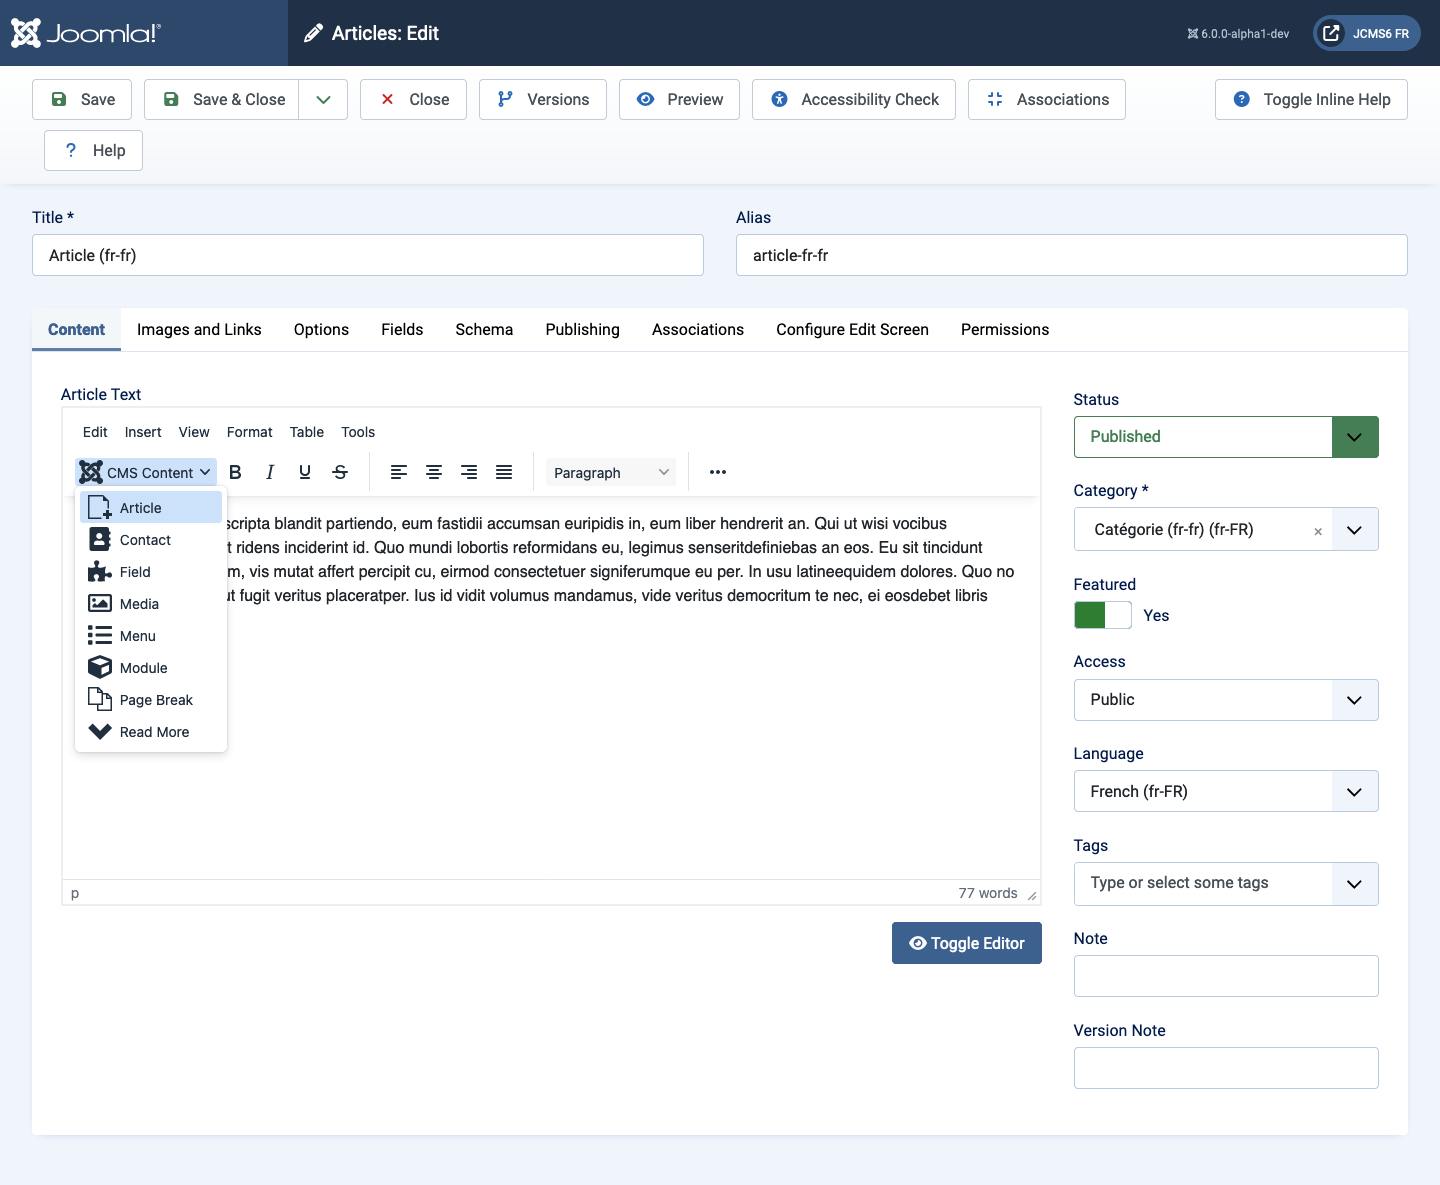
Screenshot
Form Fields
- Title The Title for this article.
- Alias The internal name of this article. Normally, you can leave this blank and Joomla will fill in a default value based on the Title but in lower case and with dashes instead of spaces.
Content tab
Left Panel
-
Article Text This is where you enter the contents of the article. Joomla includes 3 editors, the default Editor - TinyMCE is shown above.
The CMS Content dropdown list provides for access to link to an Article, Contact, Field, Media image, Menu, Module, Page Break or Read More break.
The ellipsis symbol () toggles visibility of extra tools.
-
Toggle Editor The button below the edit window allows you to toggle between the TinyMCE editor and no editor. This allows you to see and sometimes fix the HTML code.
Right Panel
- Status The published status of this article.
- Published Article is visible in the Frontend of the site.
- Unpublished Article is will not be visible to guests in the Frontend of the site. It may be visible to logged in users who have edit state permission for the article.
- Archived Article will no longer show on menu items or Category List.
- Trashed Article is deleted from the site but still in the database.
- Category Select the Category for this article.
- Featured Select Yes if article will be shown in the Featured menu item
- Access Select the viewing access level for this article. The access levels depend on what has been set up in Users: Access Levels.
- Language Select the language for this article. Keep the default of 'All' if you are not using the multi-language feature.
- Tags Assign tags to this article. You may select a tag from a pre-defined list or enter a new tag by typing the name in the field and pressing enter.
- Note This is normally for the administrator's use (for example, to document information about this article) and does not show in the Frontend.
- Version Note Optional field to identify the version of this article in the article's Version History.
Images and Links tab
Note: This tab can be hidden in Article: Options by a user with Admin permissions. It allows display of images and links in articles using standardised layouts.
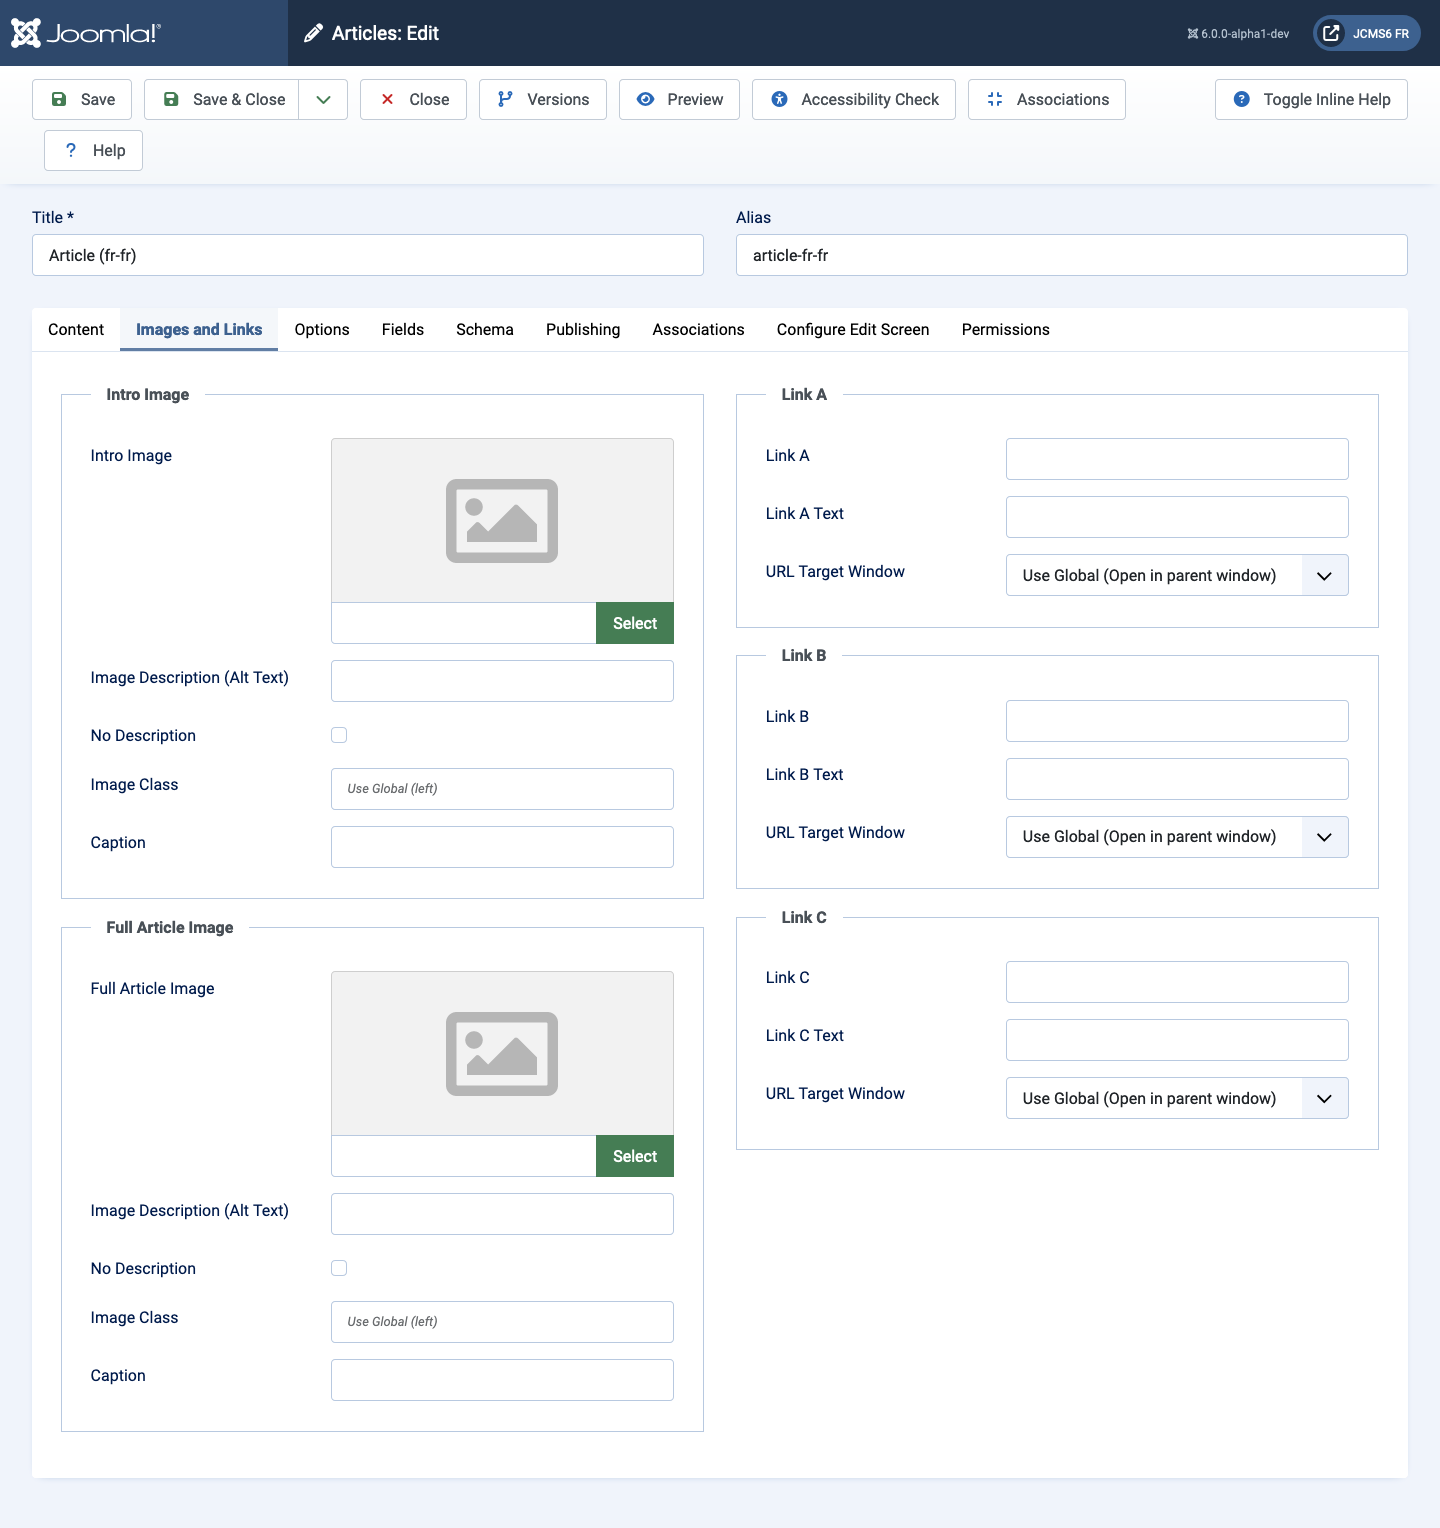
Intro Image
- Intro Image Click the Select button to select an image to be displayed in a fixed location in the Intro Text of this article. This will open a window that allows selection of an image from the images folder.
- Image Description (Alt Text) Set the alt attribute for this image. A few descriptive words for screen readers.
- No Description Check in the rare instance of a purely decorative image. Note that if the Image Description is empty and the No Description checkbox is unchecked then the image will fail to meet accessibility criteria. If an image description is present this checkbox has no effect.
- Image Class Add any CSS class for custom styling. For example, for image position use float-start or float-end.
- Caption Create a caption for this image.
Full Article Image
- Full Article Image Click the Select button to select an image to be displayed in a fixed location in the Full Text of this article. This will open a window that allows selection of an image from the images folder.
- Image Description (Alt Text) Set the alt attribute for this image. A few descriptive words for screen readers.
- No Description Check in the rare instance of a purely decorative image. Note that if the Image Description is empty and the No Description checkbox is unchecked then the image will fail to meet accessibility criteria. If an image description is present this checkbox has no effect.
- Image Class Add any CSS class for custom styling. For example, for image position use float-start or float-end.
- Caption Enter an optional caption for this image.
Link A
- Link A The URL for the first link to be displayed in a fixed location in the article text. This may be a full URL to an external site or a link to a page on the same site.
- Link A Text The text used for Link A. If blank, the URL will be displayed.
- URL Target Window Sets the default value for the target for the
first Link in this article. Choices are:
- Open in parent window Opens the in the main browser window, replacing the current Joomla article.
- Open in new window Opens the link in a new browser window.
- Open in popup Opens the link in a pop-up browser window (without full navigation controls).
- Modal Opens the link in a modal pop-up window. From Joomla 6 the link can be to an external source or to some hidden text in the current article. In the example below the local link target would be #my-popup-target and the link text whatever is appropriate:
<div class="hidden">
    <div id="my-popup-target">
        <p class="p-3">Lorem ipsum dolor sit amet, cu vis velit signiferumque, eos no possim mollis facilisi.</p>
    </div>
</div>
Link B, Link C
- Same options as Link A.
Options tab
Note: This tab can be hidden by a user with Admin permissions in the Article: Options. It is a set of options used to control how this article will show in the Frontend.
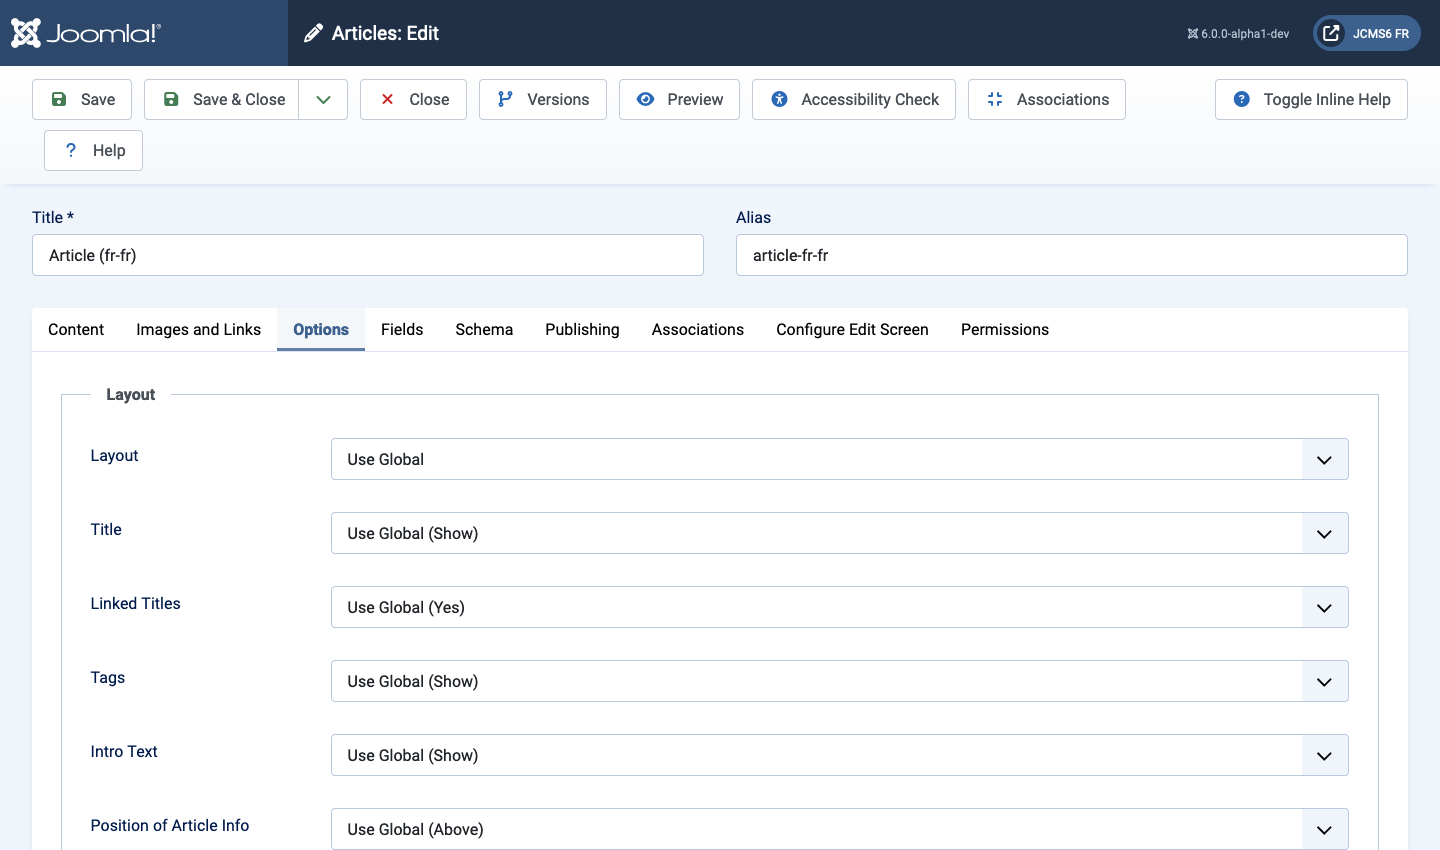
Layout
- Layout Use a layout from the supplied article view or overrides in the templates.
- Title Show the Article's Title.
- Linked Titles Show the title as a link to the article.
- Tags Enter tags for this article. Select existing tags by entering in the first few letters or create new tags by entering them here.
- Intro Text
- Show The Intro Text of the article will show in a page displaying the complete article.
- Hide Only the part of the article after the Read More break will show in a page displaying the complete article.
- Position of Article Info
- Above Puts the article information block above the text.
- Below Puts the article information block below the text.
- Split Splits the article information block into 2 separate blocks. One block is above and the other is below the text.
- Article Info Title Displays 'Details' on top of the article information block.
Category
- Category Show the Article's Category Title.
- Link Category Show the title as a link to that Category.
- Parent Category Show the Article's Parent Category Title.
- Link Parent Category Show the title as a link to that Category.
Associations
- Associations Show the associated flags or Language Code. Multilingual only.
Author
- Author Show the author of the Article.
- Link to Author's Contact Page Show it as a link to a Contact layout for that author. Note: The author must be set up as a Contact.
Date
- Create Date Show the Article's create date.
- Modify Date Show the Article's modify date.
- Publish Date Show the Article's start publishing date.
Options
- Navigation Show navigation links, Prev and/or Next, when displaying a page containing the full article.
- Hits Show the number of times the article has been displayed by a user.
- Unauthorised Links If Yes, the Intro Text for restricted articles will show. Clicking on the Read more link will require users to log in to view the full article content.
- Positioning of the Links
- Above Links are shown above the content.
- Below Links are shown below the content.
- Read More Text Customise the text that shows for the default wording 'Read more'.
- Browser Page Title Text for the Browser page title to be used when the article is viewed with a non-article menu item. If blank, the article's title is used instead.
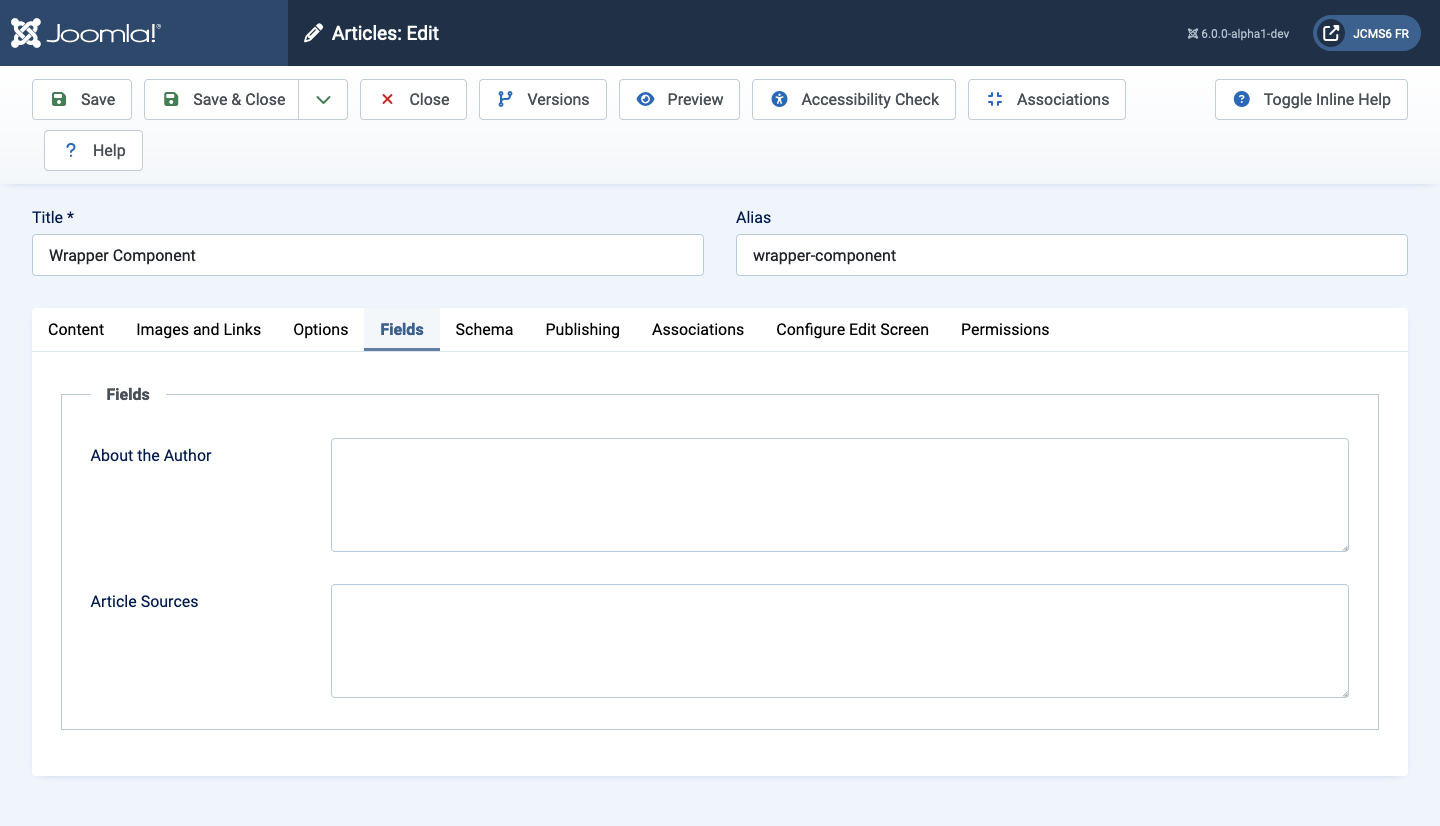
Fields tab
This section shows the custom fields which are defined for this article. These are fields that are not assigned to a Field Group. Each Field Group, if defined, will appear as a separate tab.
Configure Edit Screen tab
Note: This can be hidden by a user with Admin permissions in the Article: Options.
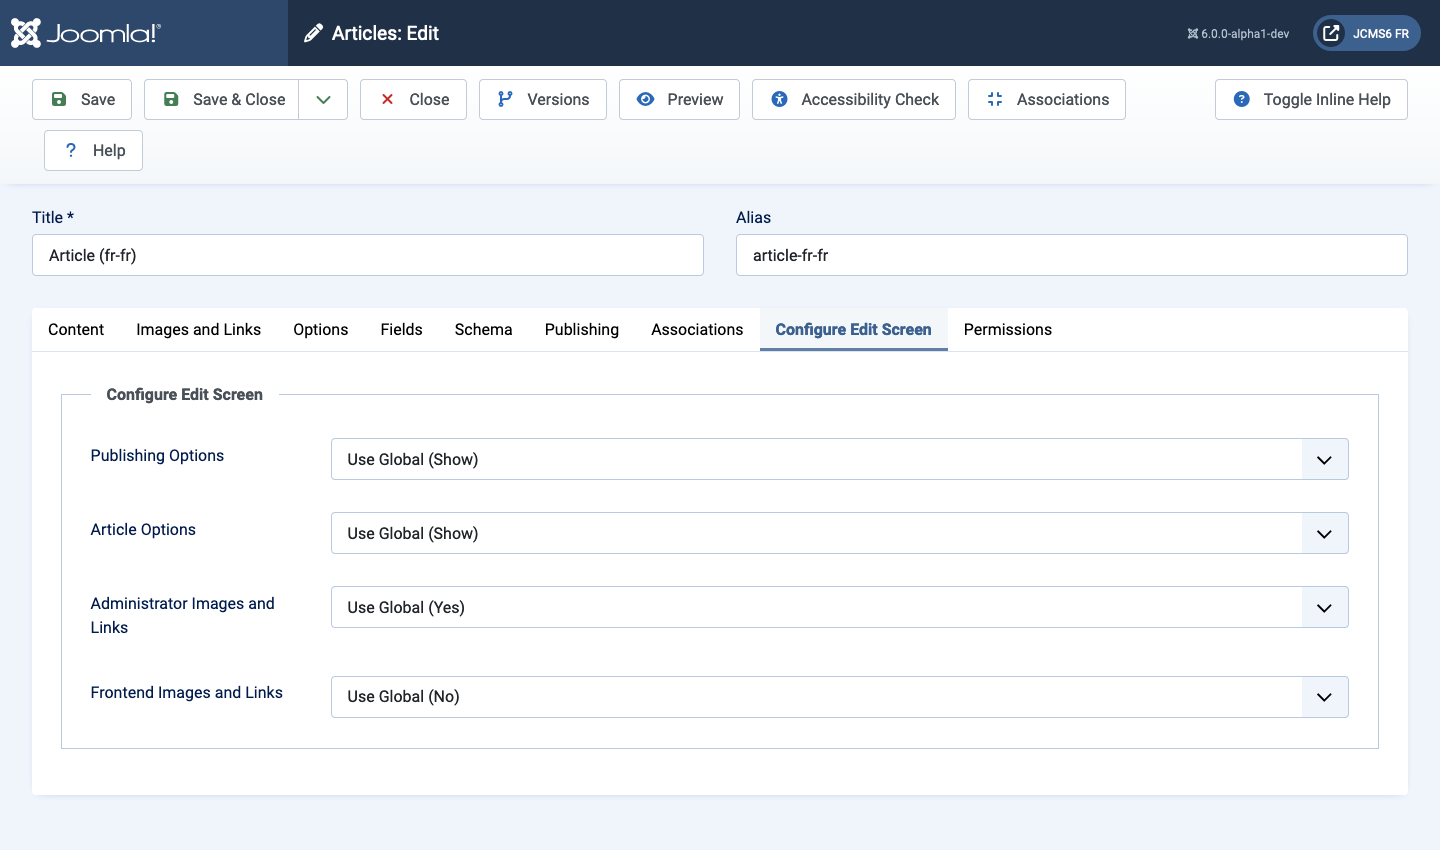
- Publishing Options If Hide, the Publishing Options tab will not show in the Backend. This means that Backend users will not be able to edit the fields in this tab. These fields will always be set to their default values.
- Article Options If Hide, the Article Options tab will not show in the Backend. This means that Backend users will not be able to edit the fields in this tab. These fields will always be set to their default values.
- Administrator Images and Links If Yes, the Images and Links tab will show.
- Frontend Images and Links If Yes, the Images and Links tab will show in the Frontend article editor screen.
Tips
- There are 2 methods to insert an image into article using the TinyMCE editor.
- The CMS Content dropdown list provides access to the Media screen.
- The Insert dropdown list is a simple form for which requires the image url. It is used for external images.
- A Read More insert saves space on any Featured or Blog layout page by showing just the first portion of an Article. Page Break inserts provide multi-page navigation for long articles. Both may be used in a single article if desired. For example, a Read More break could be placed after the first paragraph and Page Break breaks could be placed after later groups of paragraphs to create a multi-page article. No page navigation would display on the Featured or Blog page until the User selects the Read more link. At that time, the Article's table of contents would display showing links to every page.