Joomla Magazine
Manual Index
Part 2: Cypress
Review
This article is the second of a series. It covers testing using Cypress.
Original Article
In this series, we explore methods and tools to test a Joomla extension. In this second episode, we’ll focus on Cypress as a tool for end-to-end tests.
Automated tests in the browser
In episode one we tested an extension with PHPUnit. The extension under test was not installed in Joomla, but we tested specific methods of classes: isolated “units”. We will now test an installed extension, by simulating how a user interacts with the website, as a whole. We let the test suite log in, if necessary, navigate to a page, fill in fields and click on buttons. All the while checking if the results are what we expect them to be.
Joomla has done these kinds of end-to-end (“e2e”) tests in the past with Selenium, later enhanced with Codeception, but it still was a hassle to create good and stable tests. Happily, several JavaScript based test tools became available. One of the most popular ones is Cypress, and we use that in Joomla now. With Cypress it has become much easier to automatically test an installed extension in the browser. Even more, it is fun! I really like it to see the tests in action, see them clicking through Joomla, it is very clear what is tested and it is not difficult to set up.
Astrid Günther published an excellent article about testing with Cypress in the June 2023 edition of this Magazine. It contains a lot of valuable information, you really should read it. One of the things I like very much about her articles and book about extension development, is that she refers to relevant pull requests, so you get some background about why things are how they are.
Cypress also has clear documentation and other resources to learn from.
Setting up Cypress in Your Repository
The repository of the Weblinks extension gives a nice example of how you can properly set up your own extension repository. You don’t have to reinvent the wheel. Have a look at the package.json and cypress.config.dist.js files, and at the /tests folder.
There are 2 files you’ll have to set up:
- package.json for Node package dependencies.
- cypress.config.mjs: the Cypress configuration file.
Node Package Dependencies: package.json
Cypress runs on Node.js and can be easily installed as an npm package
(Node Package Manager package), after you have installed node on your
machine. There also is a special Joomla npm package with custom
utilities for Cypress. All those dependencies are listed in a
package.json file in the root of the repository and will all be
installed when you run npm install on the command line.
See the package.json file in the weblinks repository. This is how the developer dependencies part of the package.json file can look like:
"devDependencies": {
   "cypress": "^13.17.0",
   "joomla-cypress": "^1.3.1",
   "mysql": "^2.18.1",
   "pg": "^8.13.3",
   "smtp-tester": "^2.1.0"
}
More info about that
joomla-cypress package can be found in their
repo. It has handy commands
that you can use in your tests, like doAdministratorLogin and doFrontendLogin
to let the testsuite login in the Joomla site that you set up to test your
extension.
Cypress Configuration File: cypress.config.mjs
In the root of your repo you’ll need a cypress.config.mjs file. You can copy it from the cypress.config.dist.js file in the weblinks repo, and then adjust it for your extension. I have made for instance one to write Cypress tests for an e-commerce component. It looks like this:
import { defineConfig } from 'cypress';
import setupPlugins from './tests/cypress/plugins/index.mjs';

export default defineConfig({
   fixturesFolder: 'tests/cypress/fixtures',
   videosFolder: 'tests/cypress/output/videos',
   screenshotsFolder: 'tests/cypress/output/screenshots',
   viewportHeight: 1000,
   viewportWidth: 1200,
   e2e: {
       setupNodeEvents(on, config) {
         setupPlugins(on, config);
     },
     baseUrl: 'http://localhost/J5-Ecommerce',
     specPattern: [
       'tests/cypress-e2e/*.cy.{js,jsx,ts,tsx}'
     ],
     supportFile: 'tests/cypress/support/index.js',
     scrollBehavior: 'center',
     browser: 'firefox',
     screenshotOnRunFailure: true,
     video: false
 },
 env: {
     sitename: 'E-Commerce Test',
     name: 'Test User',
     email: This email address is being protected from spambots. You need JavaScript enabled to view it.',
     username: 'test-user',
     password: 'pw0123456789',
     db_type: 'MySQLi',
     db_host: 'localhost',
     db_port: '',
     db_name: 'j5-ecommerce',
     db_user: 'root',
     db_password: '',
     db_prefix: 'c0cds_',
   },
})
The baseUrl entry in that config file pointed to the local Joomla 5
test-site I had put up and installed the e-commerce component on to run
tests:
baseUrl: 'http://localhost/J5-Ecommerce',
The tests will be put in the tests/cypress-e2e folder, as I defined in
the specPattern entry of this config file.
Add Custom Commands (optional)
You can define utilities for repeating code. That keeps your tests clear and clean.
To start with, I simply copied the whole /tests/cypress folder from the
weblinks repo. In that way I have the same plugins and commands
available (which are also used in the main Joomla CMS repo test suite).
Most of it is not needed to test a specific extension, but it is a nice
example of how you can create your own utilities. An interesting
collection of commands is in the /tests/cypress/support/commands/db.mjs file:
here you’ll find commands to directly insert records in the database in
order to set up temporary data to be used in your tests. For instance,
to directly add an article to the database, you can use the
db_createArticle command. Specially for the Weblinks component a
db_createWeblink command was added.
I wanted to test an e-commerce component, so I added a
db_createProduct command in the same way, to easily create some
temporary products to test. Creating test products can be done in the
beforeEach() function on top of the test file. Cleaning up the database
can be done in the afterEach() function. For clarity I left out both
this setup and teardown in the following listings of example tests.
Writing Tests with Cypress
To test the e-commerce component I set up the repo for the use of Cypress as described above. I put the tests in the test/cypress-e2e directory. I’ll give some simplified examples, not the actual complete test suite.
Test Expected Functionality
Start with the happy path: testing that core features work as expected.
describe('E-Commerce Product Features', () => {
  beforeEach(() => {
    cy.visit('/')
  })

  it('displays products on the shop page', () => {
    cy.visit('/index.php?option=com_cart&view=products')
    cy.get('.cart-product-item').should('have.length.at.least', 1)
    cy.get('.cart-product-title').first().should('be.visible')
  })

  it('shows product details when clicked', () => {
    cy.visit('/index.php?option=com_cart&view=products')
    cy.get('.cart-product-item').first().click()
    cy.url().should('include', 'view=product')
    cy.get('.cart-product-description').should('be.visible')
    cy.get('.cart-add-to-cart-btn').should('be.visible')
  })

  it('adds product to cart', () => {
    cy.visit('/index.php?option=com_cart&view=product&id=1')
    cy.get('.cart-add-to-cart-btn').click()
    cy.get('.cart-cart-count').should('contain', '1')
    cy.get('.cart-notification').should('contain', 'added to cart')
  })
})
Then the negative tests: validate that errors are prevented or handled correctly.
describe('E-Commerce Error Handling', () => {
  it('handles invalid product ID gracefully', () => {
    cy.visit('/index.php?option=com_cart&view=product&id=99999')
    cy.get('.cart-error-message').should('contain', 'Product not found')  })

  it('prevents checkout with empty cart', () => {
    cy.visit('/index.php?option=com_cart&view=checkout')
    cy.get('.cart-empty-cart-message').should('be.visible')
    cy.get('.cart-checkout-button').should('not.exist')
  })
})
It is recommended to use a dedicated attribute to identify your
elements, for instance data-test="cart-product-description", instead
of the selection of css-classes you see in the listing above, because
they are less likely to change over time. But this was an existing
e-commerce application that I wanted to test, so then you have to use
whatever is useful to identify elements on a page.
Edge Case Testing
Edge cases are those scenarios that exist at the boundaries of expected behavior. There's a classic joke about that:
*A software tester walks into a bar.
Orders a beer. Orders 0 beers. Orders 99999999999 beers.
Orders a lizard. Orders -1 beers. Orders a ueicbksjdhd. *
The first real customer walks in and asks where the bathroom is.
The bar bursts into flames.
This illustrates that you should test for all kinds of scenarios where a problem can be expected. But it also shows that in the real world there can always happen something unexpected, which can have disastrous consequences.
describe('E-Commerce Edge Cases', () => {
  it('handles extremely large quantities', () => {
    cy.visit('/index.php?option=com_cart&view=product&id=1')
    cy.get('.cart-quantity-input').clear().type('999999')
    cy.get('.cart-add-to-cart-btn').click()
    // Should either add with limit or show appropriate message
    cy.get('body').should('not.contain', 'Fatal error')
  })

  it('handles concurrent cart operations', () => {
    cy.visit('/index.php?option=com_cart&view=product&id=1')
    // Rapidly click add to cart
    cy.get('.cart-add-to-cart-btn').click().click().click()
    cy.wait(1000)
    // Item count should be accurate
    cy.get('.cart-cart-count').invoke('text').then(parseInt).should('be.gte', 1).and('be.lte', 3)
  })
})
For edge case testing you sometimes input some strange values. The same holds for security testing: check how possibly malicious inputs for SQL-injection, XSS scripting etc. are handled.
There are also possibilities for accessibility testing with Cypress, but we will cover that in a separate episode of this series.
Running the tests
In order to test an extension with Cypress, you’ll have to set up a test
site, install the extension, refer to that test site in your
cypress.config.mjs configuration file, and of course: write the tests.
On the commandline you type: npm run cypress:run to run the tests
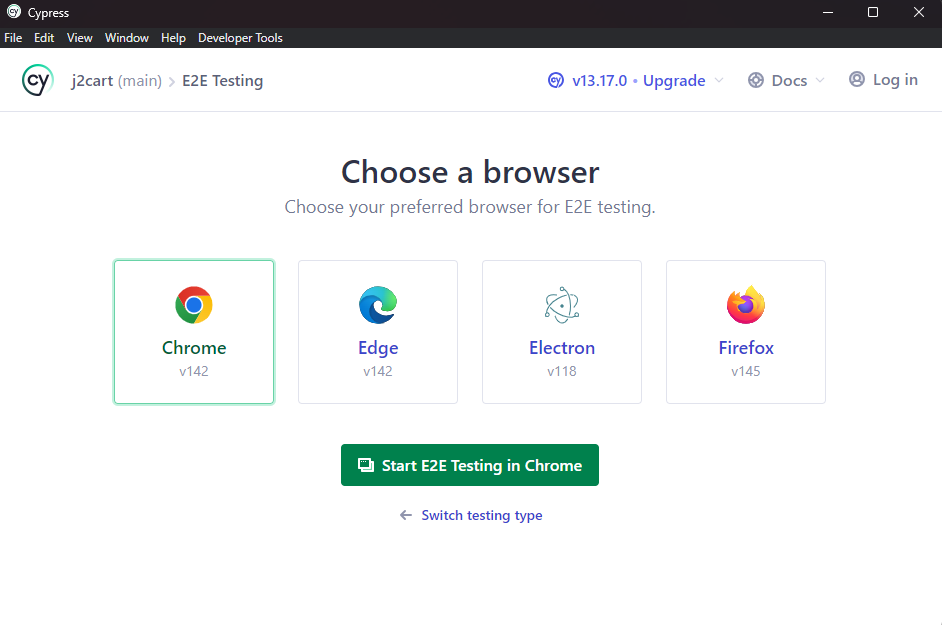
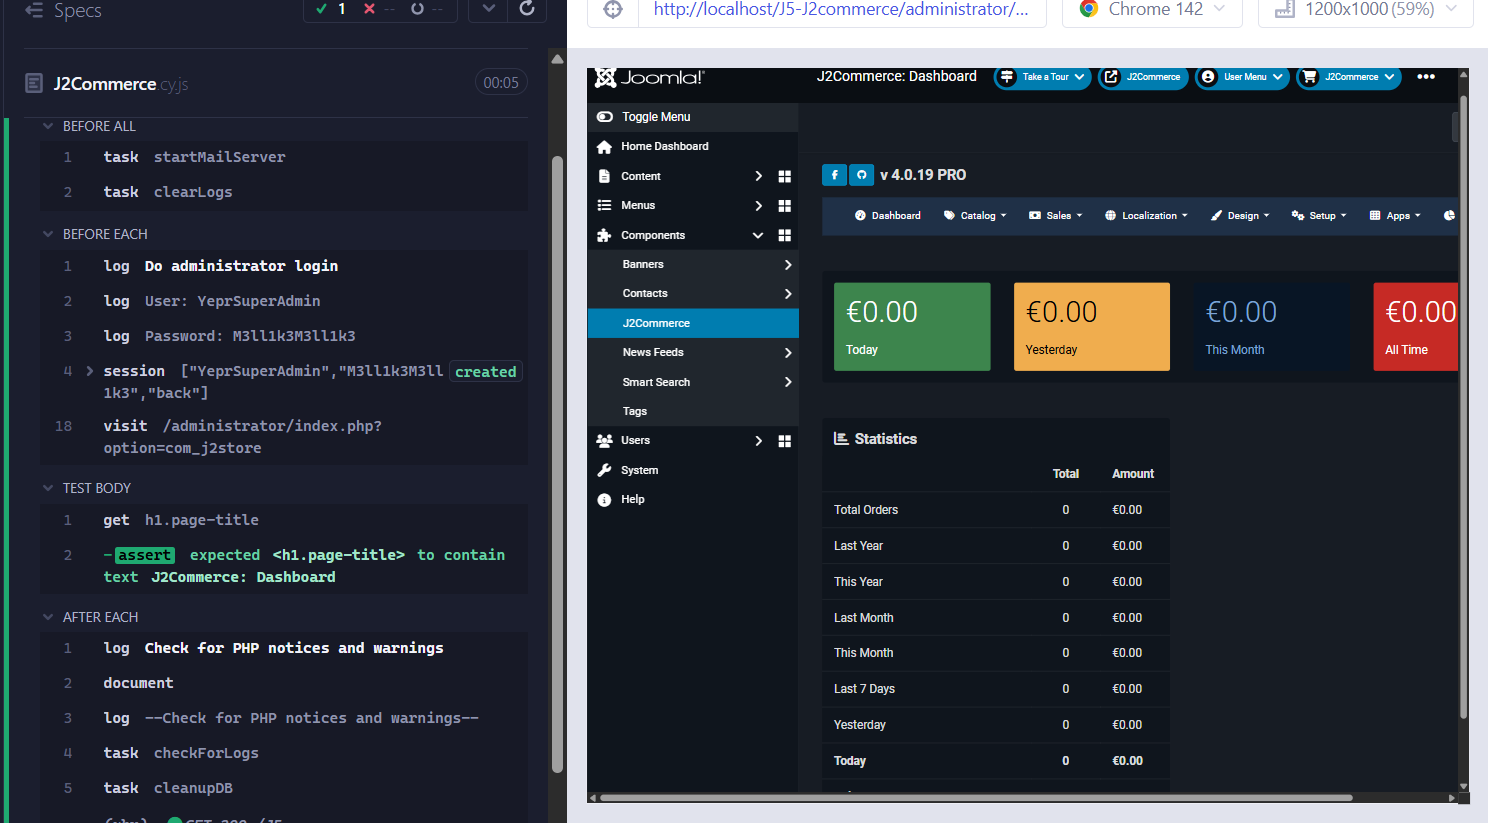
“headless”, that is: without seeing what happens in the browser. But you
can also watch the tests running, by typing: npm run cypress:open and
choose that you want to run E2E tests and in what browser. Get your
popcorn ready and enjoy the show!

Tests as Guards while Migrating
Say you have an e-commerce extension that still uses Joomla 3 style code. It all works in the latest Joomla, but you want to bring the code up-to-date to be really future-proof. A good first step is to make tests that show the current features are working. Then, when step-by-step refactoring towards newer code, you can at any moment test if everything is still working. This is called regression testing. If a test breaks, it can also be because of the test being too implementation-specific. Then improve the test. End-to-end tests are more suitable for such regression testing than unit tests, because the latter are closer related to a specific implementation.
Tests often show developers how something is used, so they also serve as documentation. For instance, at the moment there is not a very extensive documentation of the web services API of com_media. In the OpenAPI documentation of our web services API that Alexandre Elisé made you’ll only find the endpoints specified, but not that you have to base64 encode the image in order to POST or PATCH it. Luckily Alexandre provided a link to the tests, and there you can see the base64 encoding that is needed. Of course we must have this better documented, but it is an example where tests can provide some developers documentation of how to use something.
Next Month: PHPStan
The next episode in this series will be about using PHPStan for static analysis. Static code analysis is a method of debugging by examining source code even before a program is run. You don’t even have to write a test to catch bugs.
Notes
- Hannes Papenberg: “Off to Cyprus, ehm, Cypress - How Joomla does its end-to-end testing”, Joomla Community Magazine, October 2022.
- Astrid Günther: “End-to-end testing with Joomla! and Cypress - My First Steps and thoughts”, Joomla Community Magazine, June 2023.
- Cypress documentation.
- Learn more about Cypress.
- The repository of the Weblinks extension on Github.
- Joomla-cypress npm package and the Joomla-cypress Github repository.
- I use a .mjs file extension, so you can easily import ES Modules.
- See for instance this article about Cypress security testing and vulnerability management.
- For accessibility tests with Cypress, see for instance the cypress-axe plugin.